

DSC02745
DSC02746
DSC02748
DSC02749
etc.....
So this starts turning into a problem especially if you want to be able to find photos quickly based on filename alone. Or if you want to better organize your photos here's the easy way how.
First of all download this program called ReNamer. Here's the link.
Once you you install it, open it, and follow these steps.
1- We need to make a rule, or in other ways how the program is going to rename the files. In this example we're going to rename all the files to "Florida Trip" followed by a number sequence. (Florida Trip 0001, Florida Trip 0002, so on...) You of course can change "Florida Trip" to whatever it is you need. CLICK where it says "Click Here To Add A Rule" the following menu should appear
2-Now Click on DELETE- since first we will want to Delete the the file name all the way to the extension (.jpg) so that we can make room for our new file name. Once you click Delete you should get several options. Under "From" it should stay as position: 1 , but just change "Until" and click on till end. Here's a pic to use as reference. After it loks like the pic click on ADD RULE.

3- Ok 1 rule down, 2 more to go. Now we'll add the new file name, in this case "Florida Trip"
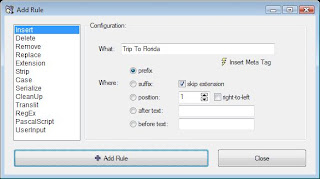
Click on the plus sign to ADD a new rule. It menu as the 1st pic should open again, its in "INSERT" just where we need it. Where it says "What:", is where you would add the new file name. So I'll be putting "Florida Trip" in that space, MAKE SURE TO ADD AN EXTRA SPACE AFTER TRIP, OR AFTER WHATEVER FILE NAME YOU WILL BE PUTTING (so in reality it should be "Florida Trip " with the extra space after the "p"). Now a little further down it says "Where" click on prefix. Here's a picture reference. Click Add Rule when done.

4. -Now for the last time click on the plus Sign to "Add a new rule". This time click on "Serialize". Where it says "Where:" click on "suffix". And then on the bottom checkmark "Pad to length" and put a 4 next to it. Here's another picture reference. Click ADD RULE.

5- Now we're done with our rules. Now to select the files or folder you want to rename. Click on either "Add Files" or "Add Folders" right under File. Find the files that you want and they will load on the bottom half of the window. Now click on PREVIEW so that you can see how they will be renamed. Here's what mine would look like.

If your happy with the results click on "RENAME" and you're done!
6 - Last but not least click on "Preset" on top. And then "Save As" so that you can save the set of rules you just created so that you can use it to rename other photos in the future. All you would have to do, is simple click on "Preset" and then "Load" and you should see your saved Rules. Of course you would have to edit the 2nd rule with a different file name to suit your needs. Just click click edit, and change the "What:" section and you'll be done.
Hope this quick tutorial helps you out.
share on: facebook


No comments:
Post a Comment