Search & Win
Showing posts with label tutorial. Show all posts

Thursday, March 26, 2009

Easy way to convert PNG to ICO – to make icons

I recently posted a link to many icons, but it turns out that some of these icons where in .png format, which is used by docks. Unfortunately this format doesn’t allow you to change your desktop icons, since they have to be .ico files.

Here’s the solution, download which ever icons you liked, and simply convert them here for free. Convert ICO, allows you simply upload the PNG file and convert it to ICO so that you can apply it as a desktop icon. Nice and simple, so what are you waiting for, change those boring desktop icons. Click here to go to Convert ICO.


share on: facebook

Friday, February 13, 2009

Download ANY video from Youtube as a MP3

Well last post i explained how to download a video from YouTube as a file so that you can watch it on your pc, or put in on your ipod or a dvd. Now what we're going to focus on is how to save videos as MP3s.

Its very simple, you copy the link of the video you're on and then head on over to Listen To Youtube and just paste the link there. That site should convert it to an MP3 and save it on your pc.

Of course if you want to skip using the site...then here's the GreaseMonkey code that you can download. Enjoy!!

share on: facebook

Thursday, February 12, 2009

How To Add Download Links, Auto HD Video, and Black Background to YOUTUBE

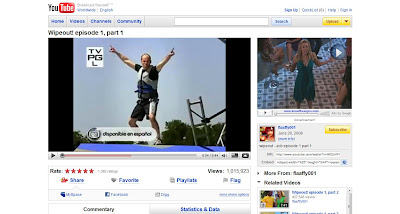
Everyone uses youtube, whether its to see the latest basketball play everyone is talking about, movie trailer, funny/stupid clip that people film, or even the latest episode of your favorite tv show. With this tutorial you'll make youtube that much better. Well discuss:


1- How to add Download Links for videos- to save in .flv, .3gp, or .mp4 (for ipods)

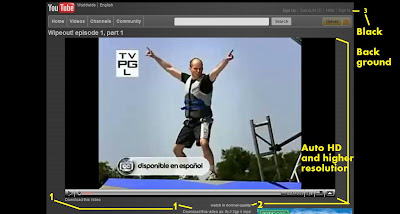
2- How to make Youtube play the HD version of the video automatically.

3- How to make Youtube's background black to make it easier on the eyes. 

(click to enlarge)

If you like these changes, then lets get started. Estimated Time: 5 minutes

1- First, download and install Firefox(FF) web browser. Click Here

2-Once thats done with download GreaseMonkey which is an extension for FF. Click Here 
Greasemonkey allows you to run scripts that make websites act differently. When its installed you should see a monkey on the right hand corner of FF. So once its install now you need to download the script.

3- This script will give you the download options and also higher resolution video. It does have one annoying feature (at least in my opinion), which is looping of videos, but don't worry we can change that easily. Here's the script. Click install on the right.

4- Once installed go to any youtube video and you should see the changes I mentioned. If you're satisfied and don't want the black background you can stop here and jump to step 9 if you want to fix the looping of videos. If not then, thanks for reading and I hope you enjoy your new youtube.

5- To get the black background, we have to install another addon called Stylish for FF. Click here

6- Once installed you should see the following on your right hand corner in FF. (click to enlarge)


7- Now go to www.youtube.com

8- Now click on stylish and a menu should pop up. Select "Find Styles for this Page"
This should open up another tab, where you will find many different styles for Youtube. The one that i'm using to make mine black is called aByte: another Black YouTube Embodiment. Find it on the list or simply click here . Scroll to the bottom and click Load Into Stylish. And thats it!!

So now you have YouTube ready to watch and download as you please. THANKS FOR READING!!


Now.. if you do not like the fact that the video loops at the end because of the Greasemonkey video, like I didn't, here is the quick fix.

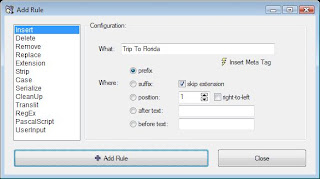
9- Right-Click on Greasemonkey and Manage User Script. A window should pop up. On the left hand panel, select Youtube HQ +720p Ultimate.... Now on the bottome left hand corner click on Edit. It should ask you to pick what program to edit the script with. Find and select notepad.
It should be in your Windows directory. (ex. C:\windows\notepad.exe) Click ok and it should open up.

10-  You should get the following window. The line that we need to fix is is titled "loop" (look at the picture for reference) (click to enlarge)


11- Save it and you're done. No more looping at the end of the video!

If you have any questions or some part of this tutorial is not clear, please leave a comment, and I'll answer it. Thanks for reading!!


share on: facebook

Thursday, February 5, 2009

Finding Wallpapers that fit EXACTLY

Here's a neat trick. If you want to find a wallpaper using google, but are tired of getting those that don't fit your screen exactly so they look ugly, then just use this simple command in google.

imagesize:(your resolution)(keyword)   and press enter, and search for images. For example


imagesize:1280x800 sky       If i'm looking for a wallpaper of the SKY thats 1280x800
or
imagesize:1024x768 dark knight     To find wallpapers of DARK KNIGHT that fits 1024x768


If you're not sure of your resolution just right-click anywhere on your desktop and select Display Properties where you shold find your resolution.  Or simply click here on WHAT IS MY RESOLUTION. This website will tell you, your resolution. 

share on: facebook

Friday, January 30, 2009

Rename all Your Photos FAST and for FREE

Everyone has a digital camera now a days, and that means a mess when it comes to exporting the photos to your computer. Usually you get a folder full of photos that have the same name for example Sony models usually come out looking like this

DSC02745
DSC02746
DSC02748
DSC02749

etc..... 

So this starts turning into a problem especially if you want to be able to find photos quickly based on filename alone. Or if you want to better organize your photos here's the easy way how.

First of all download this program called ReNamer. Here's the link.

Once you you install it, open it, and follow these steps. 

1- We need to make a rule, or in other ways how the program is going to rename the files. In this example we're going to rename all the files to "Florida Trip" followed by a number sequence. (Florida Trip 0001, Florida Trip 0002, so on...) You of course can change "Florida Trip" to whatever it is you need.  CLICK where it says "Click Here To Add A Rule"  the following menu should appear 

2-Now Click on DELETE- since first we will want to Delete the the file name all the way to the extension (.jpg) so that we can make room for our new file name. Once you click Delete you should get several options. Under "From" it should stay as position: 1  , but just change "Until" and click on till end. Here's a pic to use as reference. After it loks like the pic click on ADD RULE.


3- Ok 1 rule down, 2 more to go. Now we'll add the new file name, in this case "Florida  Trip"
Click on the plus sign to ADD a new rule. It menu as the 1st pic should open again, its in "INSERT" just where we need it.  Where it says "What:", is where you would add the new file name. So I'll be putting "Florida Trip" in that space, MAKE SURE TO ADD AN EXTRA SPACE AFTER TRIP, OR AFTER WHATEVER FILE NAME YOU WILL BE PUTTING (so in reality it should be "Florida Trip " with the extra space after the "p"). Now a little further down it says "Where" click on prefix. Here's a picture reference. Click Add Rule when done.


4. -Now for the last time click on the plus Sign to "Add a new rule". This time click on "Serialize". Where it says "Where:" click on "suffix". And then on the bottom checkmark "Pad to length" and put a 4 next to it. Here's another picture reference. Click ADD RULE.


5- Now we're done with our rules. Now to select the files or folder you want to rename. Click on either "Add Files" or "Add Folders" right under File. Find the files that you want and they will load on the bottom half of the window. Now click on PREVIEW so that you can see how they will be renamed. Here's what mine would look like. 


If your happy with the results click on "RENAME" and you're done!

6 - Last but not least click on "Preset" on top. And then "Save As" so that you can save the set of rules you just created so that you can use it to rename other photos in the future. All you would have to do, is simple click on "Preset" and then "Load" and you should see your saved Rules. Of course you would have to edit the 2nd rule with a different file name to suit your needs. Just click click edit, and change the "What:" section and you'll be done. 

Hope this quick tutorial helps you out. 

share on: facebook

Thursday, January 22, 2009

Google Chrome Slowing Down Your Pc?

If like many, you wanted to try out Googles new web browser, CHROME, then you propably noticed that it could hog lots of your PCs ram. This happens because Chrome opens up a new instance of itself, for every tab that you have open. Chrome does this because if you have a problem in which one of the tabs stops responding then you won't have to close the rest of your open tabs. Sounds nice, but this could also seriously cripple your system. 

So here's a solution, to open all your tabs under 1 instance of CHROME.

Go to your Start menu, then GOOGLE CHROME
Right-Click on Google Chrome, and select PROPERTIES
In the target box at the end after the QUOTATION MARKS (") add -single-string 

and thats it!!! 

Look at this pic if the above instructions are confusing  


So with this in mind, why not try out Google Chrome? Just click here - CHROME

share on: facebook
Search & Win